Hey guys! So, I haven't had a lot of time to work on this piece since the last time I posted, but I made sure to take some WIP shots of the compilation stage. Basically, I'm painting elements of the image separately, and then compiling them into a composition that I am happy with.
So, let's jump into it!
In the image above, I've scanned in a page of painted elements. They were all done in watercolor. After I scan these into the computer, I open the image in Photoshop where I convert it to black & white (or, Image > Adjustments > Black & White). Then I adjust the Levels until I have mostly black and a completely white background. In the images here, I actually made my levels too grey, which forced me to go back and re-do a lot of my work because the grey areas became transparent. (more on that later).
Also, note the cluttered desktop, and the Cory Godbey desktop background :)
Now I'm ready to copy everything to its own layer!
This is a slow process. It's a good idea to have some music on to keep you motivated! (I've been enjoying the new Sigur Rós album, some Christmas music, whatever helps me work!) At this stage, I use the Lasso tool to select the element I want. I then Command + click on the RGB Channels in the Channels palette. I then invert the selection (Shift+Command+I) and make a new Layer. I then fill the selection with Black (Alt+Delete). After all this is done, I select all and copy to a new layer in my painting, and then place the new layer on Transparency Lock (it's a little button on the layer palette).
This might sound like a complicated process, but it doesn't take too long when you get it committed to memory.
Now all the elements are ready to be re-sized and moved into position.
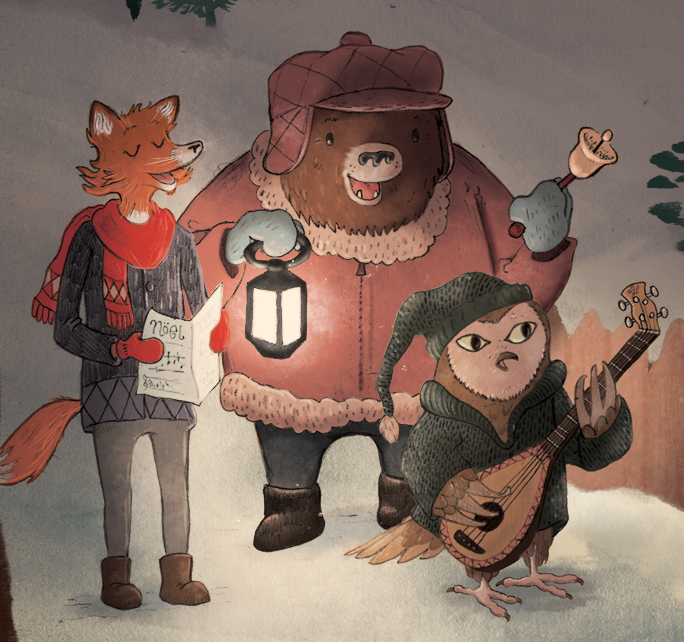
Now that each of my elements are on their own layer and on transparency lock, I can start arranging them into a pleasing composition. This step seemed to take the longest. During the process I referred to my rough sketch frequently to make sure things were where I wanted them. Also, you'll notice that everything is a bit too transparent. That's because I didn't get the blacks dark enough in the previous Levels stage. That's important! But you can see that I'm starting to lay out the scene like I want it.
Since my layers are on Transparency Lock, this means I can color them however I want without having to do any complicated selections, so everything stays neat and tidy. At this stage, I'm just laying down basic colors. I've also discovered how to make some decent texture brushes, which I'll be using to add more color and texture to the final image. The characters are being colored here with just a flat color layer underneath the line work.
____________________
So that's about it for this stage! My goal is to have this image finished by next Wednesday, so watch this space for the final image soon. Let me know if this tutorial-type stuff is interesting to you. I want to try to give you all a glimpse into what I'm learning in hope that you'll in turn learn something as well.
And finally, I want to thank Chuck Groenink for his kind advice that he's given me personally and through his blog. I have been very inspired by his work lately, along with many others. The new methods of working I've been experimenting with are largely influenced by his paintings. Be sure and check out his work here:
http://cargocollective.com/greenink
Next Time: Final Color & Texture!